Showing posts with label strawberries. Show all posts

Saturday, November 24, 2012

101 in 1001 #80

This morning, LB and I were up by 8.30am with intentions of heading to a 9.30am Pump class. But fate conspired against us, and we were informed that arriving at 9.32am was unacceptable and that we weren't allowed in.

So instead, we headed out to the Capital Region Farmers Market to pick up a couple of things, wander around and grab some breakfast. Conveniently, this crossed #80 off my Day Zero list - visit a farmers market!

It was pretty crowded, but lots of fun. There was a huge variety of stuff, from fresh pasta to flowers, from meat to macarons. There's a possibility that we each had a macaron as a pre-breakfast snack. They were delicious. They were huge as far as macarons go, so were a total bargain at $2.50 each!

After a bit more of a wander around, we stopped for breakfast at a Belgian creperie before going to eat our crepes outside in the shade. LB had the spiced apple crepe (I tried the filling - yuuuuuuuuuuum), and mine was strawberries and cream. The strawberries, unlike a lot of what's come out of the strawberry glut this year, were delicious. And the crepes themselves were cooked right in front of us. I briefly considered going back to get a second one, but restrained myself.


If I'd known that farmers markets came with delicious food stalls like this, I would have visited one much sooner!!

K xx

PS. LB and I made up for our failed attempt at going to Pump this morning with a Step class this afternoon. Since when does Step include tracks that require you to do jump squats across the step while holding a 2.5kg plate?!?! O.o

Tuesday, August 21, 2012

Challenge recipe 20: Flourless chocolate cake

It was my mum's birthday over the weekend, so I took advantage of the opportunity to cross another recipe from my Cookbook Challenge off the list! She's gluten intolerant, so this flourless chocolate cake was ideal. (Warning: some of these photos are overexposed. I would fix them, but it's late and I had six hours of class today, and apparently my new laptop doesn't come with easy-to-use editing software like my old one did. LAAAAAAAAAAME).

ANYWAY. Here's the book:

And here's what you'll need:

Start by greasing and lining a 23cm springform tin:

Then chop up 400g (FOUR HUNDRED GRAMS!!) of dark chocolate and melt it in a double boiler:


Once it's melted, take the chocolate off the heat and put it to one side to cool. While it's cooling, put half a cup of brown sugar in a mixing bowl:

Add six (SIX!) eggs:

And beat it all together until it's creamy. The book claims this will take ten minutes. It did not take ten minutes. Maybe I didn't do it for long enough?? But it had a creamy consistency, so I figured it was okay!

Next up, add a teaspoon of cinnamon:

And a tablespoon of Cointreau. Technically the recipe called for Grand Marnier, but we didn't have any. And seeing as how I'm kind of a philistine when it comes to alcohol, I figured one orange flavoured liqueur is the same as another orange flavoured liqueur, right??
It looks like water. I promise it's Cointreau.

Then pour the chocolate into the egg mixture. Pretend there's a photo here. My chocolate hadn't cooled quite as much as I would have liked, so I wanted to mix it through quickly in case it started to cook the eggs... Here's what it looked like once I'd finished mixing it together:

Next up, add in 300mL(!!) of double cream. It all sank to the bottom of the bowl, so it looks like I added about 3mL of cream. I promise it's all there:

Fold the cream through the chocolate mixture gently, and then pour the whole lot into the prepared tin:


Bake at 180 degrees C for about an hour. Mine was probably in there a little bit too long - the top of it got RATHER crispy at the edges, so maybe stick a skewer in it after 50 minutes and see how it's going:

Pull it out of the oven when a skewer comes out clean, and leave it to cool in the tin:

DO NOT BE ALARMED WHEN IT SINKS DRAMATICALLY. It is a flourless cake. This is just what happens with flourless cakes. Because basically? You've made a cake sized souffle. So this is inevitable:

Once it's cool, take it out of the tin and dust it liberally with icing sugar to cover the whole sunken and slightly too crispy thing:
FIXED IT!!

Serve with strawberries. Or, you know, more cream. But I neglected to buy more cream, so strawberries it was:

The verdict? It's pretty good, yo. Kind of like baked chocolate mousse. You can't really taste the Cointreau (maybe you'd taste it more with Grand Marnier?? I honestly have no idea), but you DO get little hints of cinnamon every so often. The recipe claims it serves eight, but it's pretty rich, so it could easily serve ten or twelve, especially if you put extra cream and berries with it.

It's really quick and really easy to make - literally the only bit that might be complicated is mixing the chocolate into the eggs without cooking it. But provided you let the chocolate cool sufficiently, even that isn't a problem!

Give it a try and let me know what you think! Just don't tell people about the ingredients - they might go running for the cardiac wing of the nearest hospital!! ;)

K xx

Thursday, December 15, 2011

Challenge recipe 18: Strawberry jam

So if you guys follow me on Twitter or Facebook, you'd know that I spent all of Sunday making strawberry jam and lemon butter and mango chutney as Christmas presents. Needless to say, it was QUITE the long day. But successful, in the end, so I guess that's what really matters!

Aaaaaaaanyway. The recipe I used was part of my cookbook challenge. And making jam was also on my Day Zero list. So I've crossed things off TWO challenge lists in one hit! #score

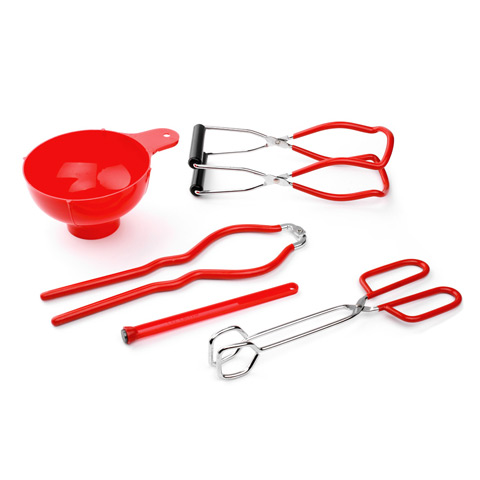
So. The most time consuming part of the entire process is actually sterilising the jars. A couple of days before, I bought a 5 piece home canning kit. It included a wide mouthed funnel, a magnetic stick thing to rescue the lids from the boiling water, a thingy that you can use to hold the hot jars while you do the lids up, a pair of tongs, and a thingy that you can use to lift the jars out of the boiling water (top right).
See? Source
All technical terms, obviously. Buying this kit was by far the best thing I could have done before attempting to make my own preserves. If you're planning on making anything that requires you to sterilise jars, I highly recommend you track one down. It was dirt cheap, too!

</segue> Here's the book:

And here's what you'll need:

Pretty simple, huh? Oh, and before you start, get a bunch of small plates or sauce dishes or whatever and put them in the fridge/freezer. You'll need them for testing if it's set later on.

To be perfectly honest, I was a little scared going in. Not just because ARGH BOILING FRUIT AND HOT JARS AND WHAT IF IT DOESN'T SET PROPERLY?!?!?! but because this was my Year 9 Home Economics book. It was first published in 1966. This edition was published in 1993, but I suspect a lot of the recipes hadn't been updated since the 60s. There is a shit ton of WASP-y food in there, yo. (Any book that teaches you to make devilled sardines should be treated with caution...) From memory, we mostly used it for the cake recipes, the cake decorating instructions, and possibly pinwheel sandwiches. Because no girl's education is complete without the ability to make pinwheel sandwiches! #seriouslyWTF

Ahem. You'll need 500g of strawberries. I weighed out 500g before I chopped them. But they had quite a lot of manky bits on them, so I reweighed them to ensure I had enough.

Put the chopped up strawberries in a large saucepan. Add in two cups of white sugar.

Yes, I know two cups is a buttload of sugar. Just do it. Squeeze a lemon:

It helps if you have an excited six year old to do it for you. Pick out the seeds and add the juice to the saucepan. Then add in 1 tablespoon of pectin. In case you're curious, here's what pectin looks like:

So, now's about the time that you want to get your jars going. Cookery the Australian Way says otherwise, but the instructions that came with the jars said to wash them in hot soapy water, rinse them off, then put them in boiling water for ten minutes. So that's what I did!

Turn the heat on under the fruit mixture, and stir constantly while bringing to the boil:

I'm sorry. I know it looks gross. Once it's boiling, reduce the heat SLIGHTLY and cook for six minutes, still stirring regularly. To simplify the clean up later, you can use a pastry brush dipped in water to dissolve any sugar that's stuck to the sides of the saucepan.

After the six minutes, grab one of the plates/dishes/whatever that you put in the fridge/freezer earlier. Take a teaspoon, and grab a little bit of the hot jam. Pour it into the cold dish and leave it for about 20 seconds:
I just realised this is technically a tea cup not a sauce dish. WHATEVER.

Once you can tip the dish and the mixture doesn't move, run your finger through it. If the surface of the jam gets crinkle marks on it, it's going to set. If not, keep cooking it and try again after another couple of minutes. Mine took either ten or twelve minutes. Once it passes the gel test, take the saucepan off the heat. Grab a clean spoon, and scrape as much of the foam off the top as you can. It's not essential (or at least I don't *think* it is!), it just looks prettier without it.

If you've timed things well, your jars should be done with their ten minutes of boiling. Turn the heat off. Haul them out of the boiling water with your handy dandy jar grabber doohickey, tip the water out of them, and set them upside down on a clean tea towel to drain. Once they're all out of the water, use the handy dandy jar grabber doohickey to turn them right way up again. Using your handy dandy canning funnel, ladle the jam mixture into the jars. I did them one at a time. Don't fill them all the way to the top - there needs to be a gap to create a vacuum so the jar will seal and the jam won't go mouldy and give you food poisoning.

Obviously, you can use the little plastic square things and rubber bands. It's probably much easier. But my jars came with lids and caps, so that's what I used. I found that the easiest way to do it was to fill a jar, then dump the lid into now-not-quite-boiling water, slowly count to ten, haul it out with the magnetic doohickey, and put it straight onto the jar. Then put the cap thingy over the top and tighten. But not too much. The instructions said 'finger tight', whatever the bleeding hell that might mean. Basically, if you do it too tight, it can't form a vacuum. So don't do it too tight, 'kay? Repeat until you've used all the jam.

It made three cups. Once you've finished, leave it somewhere to cool for at least 24 hours. At the end of the time, check if the jars have sealed. If not, open immediately and eat it all yourself.

These were intended as Christmas presents. But there was one jar that didn't seem to have sealed *quite* as much as I would have liked, so I was a little hesitant to give it to my relatives. So I get to eat it instead.

The verdict? NOM!! It's freaking amazing, you guys. Plus, it's not as sickly sweet as some store-bought strawberry jams are. I mean, YES, you can walk down the road to the supermarket and buy a jar of jam and not have to go through all the drama. But where's the fun in that?! ;)

Has anyone else made jam before? How did it go? (And did anyone else have a weird WASP-y home ec book???)
K xx

PS. The mango chutney and the lemon butter are pretty amazeballs too. If anyone wants the recipes, just let me know!!

Tuesday, March 1, 2011

Challenge recipe 6: Mixed berry and mint sorbet

Given that this week marked the end of summer, I figured I should get this one out of the way before the weather cools down too much. Sorbet's hardly appropriate for cool weather!

Here's the book:

Yes, I own the Biggest Loser cookbook. But to be honest, I've only ever used the exercise parts of the book, not the recipes. Anyway, here's what you'll need:

It's pretty basic stuff. Start with 1.5 cups of water and 1/2 cup caster sugar. Dump them into a saucepan, thusly:

Heat until the sugar is dissolved, then bring to a boil. Once it's boiling, add in 3/4 cup of mixed berries.

Cook until the berries are soft - this should only take a couple of minutes:

Then take 1/2 cup mint leaves:

Turn off the heat, and add the mint leaves to the pan:

Leave the whole thing sitting around until it's completely cool. Then put a strainer over a smallish mixing bowl and dump everything into the strainer. Squish it through with a spoon - basically, you want to get the juice out of the berries without adding the seeds or the mint leaves to the sorbet:

Looks pretty gross, huh? Once you've squished out all the juice, you'll be left with this:

Pour it into a plastic container of some description:

Then stick it in the freezer overnight:

Attack it with a fork to fluff it into sorbet, and serve with a mint leaf on the top:

The verdict? Eh. I mean, it's tasty and all. And I'm sure it's lovely on a stinking hot day. But frankly, I'd rather have the berries with a little dusting of icing sugar. And it's probably healthier that way too.

That said, the mint goes well with the berries (although I think it would go better in a mojito...), and it's simple to make. So while it's something I can see sitting in the freezer until I need the Tupperware container, I might try it again during next summer and see how it goes in really hot weather. Until then, I'm sticking with 'eh'.

K xx

Monday, November 29, 2010

Baked berry cheesecake

I'll get back to the story of the Central Australian trip when I have more brain power. But for the time being, I did some baking yesterday. It was pouring with rain and freezing cold, so I decided that I'd try my hand at cheesecake. I've been meaning to for ages, it's one of the few types of baked goods I've not tried (except in brownie form!), and my original reason for not trying was the lack of a springform pan. But I've had one of those for a while now, but hadn't christened it. So when I bought a super trashy gossip magazine on Saturday and it had a recipe for baked berry cheesecake, I figured I'd give it a go!

So, here's what you need:

Start with a 23cm springform pan:

Grease and line it and set it to one side:

Then place 250g plain biscuits in the food processor:

And pulverise the crap out of them:

Then take 125g melted butter (incidentally, the photos get a bit shit for a while, because my SLR battery died):

And mix it through the biscuit crumbs:

Then press the biscuit mixture into the springform pan and put it in the fridge until firm:

While the base is in the fridge, place half a punnet of strawberries (I threw in a couple of raspberries for good measure) in the food processor:

Add in 3/4 cup of icing sugar:

(Welcome back, SLR! You were much missed - it took two point and shoot cameras and a lot of me going "Gaaaaaaaaaaaaah!!" to get the intervening photos...) And pulverise the crap out of it (that's pretty much the basis of this recipe, really!):

Then add in a 250g block of cream cheese (I used low fat) and two eggs:

And pulverise the shit out of it some more:

Then add in 300g sour cream (again, I used low fat):

And DON'T pulverise the shit out of it! Instead, pulse it until just combined:

Then, pour it into the tin on top of the biscuit crumb base:

Bake in a 170 degree oven for 60-70 minutes. It didn't say to, but baked cheesecake is usually cooled in the oven. It looked pretty...wibbly...at the end of the hour, so I cooled it in the oven with the door open. I think it got overdone a little bit:

Once it's cooled, place it in the fridge until cold. Once it's cold, remove it from the tin and the baking paper, and decorate the top with the leftover strawberries and raspberries to cover up the brown bits. Technically, you're meant to put blueberries on it too, and just arrange them all in an artistic pile. But I can't stand blueberries. So it's very...pink (Incidentally, you can see what it was MEANT to look like in the side of some of the food processor photos):

Then slice it with a knife that's been run under hot water and dust with icing sugar. I couldn't find the tiny sieve, so I had to use a teaspoon, which is why the icing sugar is a bit lumpy...

But it was delicious. And for my first attempt at a baked cheesecake (one with a fairly vague recipe, might I add!), I don't think I did too badly at all! I'll definitely be trying cheesecake in the future, but I might try one that's a little less pink, just for something different...

Give it a go, and try NOT cooling it in the oven, and let me know how it turns out?

K xx
Related Posts Plugin for WordPress, Blogger...