Showing posts with label cooking. Show all posts

Friday, January 10, 2014

Challenge recipe 23: Basmati rice salad

In the spirit of bringing back things that I've left half finished (see also: the start of yesterday's post about my trip to New Zealand), I figured it was about time to get a wriggle on with my cookbook challenge, which I started nearly three years ago and still have another six-ish recipes to complete by the beginning of April. Somehow, I went the whole of 2013 without making any new recipes from my cookbooks. Whoops????

Anyway, this one is going to be almost completely lacking in photos because a) I completely forgot, and b) I was making it because people were coming over for dinner, and I figured they probably wouldn't like it if I got all "Oh, the main course is going to be another 15 minutes or so because I need to photograph the salad from a hundred different angles, 'kay?"

ANYWAY. Here's the book:
Please excuse the crappy photo taken in 2011

My handwritten recipe book, filled with stuff I've stolen from Mum and written down from magazines as well as the best of the best from Dessert Day (the good but not great ones get printed and shoved in the front in a plastic pocket).

Here's what you'll need:
2 cups basmati rice
2 tbsp vegetable oil
2 tsp brown or black mustard seeds
1/3 cup coarsely torn coriander leaves (that's cilantro to you, America)
3 small red chillis, seeded and finely chopped
2 tbsp finely chopped ginger
1 cup plain yoghurt

And here's how you do it:
Cook rice until tender. Drain, rinse under cold water, and drain again. Place in a large bowl. Heat oil in small frying pan. Add mustard seeds and cook over medium heat 1-2 minutes or until seeds start to pop (it's a lot like making popcorn, so you may want to add a lid to the equation!).

Add seeds, coriander, chilli and ginger to rice and stir to combine. Add yoghurt a little at a time until well coated but not too wet. Season with salt and pepper. Serve at room temperature.

Serves 6.


The verdict?
It may not look particularly pretty in the above photo, but it's insanely tasty even to coriander haters like me. It's always been a hit when I've made it, and goes equally well with barbequed chicken or beef in summer. Give it a crack and see what you think!!

Is this something you'd be interested in making?

K xx

Tuesday, October 9, 2012

101 in 1001 #3

On Saturday night, I had Must Be Thrifty, her boyfriend Cheap Geek, and our high school bestie L over for dinner. And it was a blast.

In typical fashion, I went a little bit bonkers with the amount of food I made. I have a tendency to panic that there won't be enough to eat, and make an extra dish at the last minute. This was no exception. I'm going to apologise in advance for the sucky photos. I was far too distracted to get out my SLR, but I DID remember to take photos on my phone. Still, the quality's pretty craptastic.

What did we eat? All the Mexican food ever, because I loves me some Mexican food. More specifically, we ate the following:

1. This guacamole. I apologise for the godawful photos in that post. I'd only been blogging for about three months at the time I wrote it, and didn't have my SLR at the time.

2. Elotes Callejeros. I used this recipe. It was pretty freaking spectacular.

3. and 4. Beef fajitas. I used this marinade with eye fillet, and it was AMAZING. And then I made frijoles, which you can see on the top. Except that I couldn't find dried kidney beans, so it was a lot more liquid-y than it should have been, and we had to serve them with a slotted spoon. Still, they tasted pretty awesome!

5. Aaaaaand finally, churros with chocolate dipping sauce (a block of 70% cocoa dark chocolate, mixed with enough butter to make it actually melt, a couple of teaspoons of vanilla essence, and a sprinkling of cinnamon).

Oh, and Must Be Thrifty made horchata and brought a bunch of these:

Jarritos! They're all pretty delicious, but the mango is definitely my favourite.

We ate at the posh dining room table, with candles and a tablecloth and generally pretended that we were grown ups, which we're totally not. As evidenced by the fact that we spent at least half an hour giggling like lunatics about things people say in their sleep, including but not limited to the antics of Sleep Talkin' Man.

Hosting a dinner party (101 in 1001 #3)? NAILED IT.

K xx

Sunday, July 29, 2012

101 in 1001 update

With the exception of my (somewhat) recent post on teaching Little Miss A to bake, it's been a while since I updated you guys on how my 101 in 1001 challenge is going. None of them have really warranted a full post unto themselves, so I figured I'd jam a bunch of stuff into one post. WHEEEEEEEEEEEEEEEEEEE.

#10 - Read 100 new books
DONE!! I finished this the other day. There's a full list over on my 101 in 1001 page, and there are reviews of each book over on my Goodreads page. Some of them were amazing, some of them were epic pieces of shit. And I discovered a whole bunch of awesome authors to look out for, which is always good.

#19 - Reach 500 blog posts
In progress. This post makes 453, so I'm pretty sure I'll have this crossed off before the end of the year! 

#30 - Take a cooking class
DONE! I didn't realise it until I looked at the list again to write this post, but the macaron class that Deidre and I took for Super Sized Dessert Day has taken care of this one nicely.

#31 - Host a guest blogger
DONE! Another one I'd forgotten that I put on the list. Thanks to Teacher Girl and the 20SB blog swap, I crossed this off last week! 

#54 - Print out my photos
I guess this one is almost always going to be a work in progress. But I HAVE printed out a ton of photos from 2008 through to the end of my trip to America last year, along with labelling them and putting them into albums. For the moment, I'm not crossing this off, because I'm not COMPLETELY up to date with printing my photos. But maybe when I get back from America NEXT year, I'll cross this one off.

#56 - Buy a new laptop
DONE! Okay, so technically I didn't buy it. My dad bought it for me, because a) my old laptop completely shat itself over the semester break ('multiple blue screens of death' kind of shat itself. I think the hard drive died...), b) I needed a new one for uni, because we're in a shiny new "no computers provided" building, and my old one weighs about 4 kilos, and c) I have no money. But I have a new laptop, so it totally counts, right???

#59 - Follow a new blog every month
I've probably exceeded this one in almost every month. The only problem is that I reached a point where I forgot to write them down, so I'm not ENTIRELY sure of the order I followed various blogs in. Whoops? Anyway, it's still plodding along merrily.

#60 - Take a self portrait every month
Dudes. This one is an EPIC failure. I took one the first month, and THAT WAS IT. I'm definitely going to be donating $10 to charity for this one...

#65 - Keep a plant alive for a year
Nearly two months in, the plant is still alive. EXCELLENT PROGRESS, ME!

#96 - Save all coins smaller than 50c and go shopping at the end
Yeah, I've been saving all 5c, 10c and 20c pieces religiously. But I'm not sure how well that shopping spree is going to go. I currently have $14................. 

#100 - Seriously consider doing my PhD
DONE. I can honestly say that I've seriously considered this, and now that I'm arse deep in a Masters degree and racking up another $30,000 in debt to the government (thankfully, it's interest free and I pay it back through my tax!), I definitely won't be doing my PhD any time soon. I'd still like to do it one day. But maybe when I've retired. Then I can do it on something I find interesting, rather than something I think will stand a chance of getting me a job! 

So there you have it. There's a lot of stuff that still needs to be started, and a stack of stuff that needs to be finished. But I think it's going pretty well so far! 

K xx

Sunday, June 24, 2012

Challenge recipe 19: Curried vegetables

Oh, hey. Y'all probably thought I'd forgotten about this, seeing as I haven't posted a challenge recipe since LAST YEAR. #uberfailcake

Anyway, for those of you who don't remember/weren't here back in the day, the challenge is to make two recipes from each of my cookbooks. At least one has to be savoury, and they have to be recipes I haven't made before. To check out the full list of recipes I've made so far, click here.

So. Now that I'm on uni break and have a bit more time, I'm determined to cross at least a few recipes off the list!

Here's the book:

And here's what you'll need:

Just go ahead and ignore that packet of beans at the front. I had every intention of using them, but there was insufficient room in the frying pan, so...yeah.

Start by slicing up your eggplant:

Then place it on a tray, and sprinkle it liberally with salt.

Put it to one side for half an hour while you chop up the rest of your vegetables:
Butternut pumpkin

Carrot

Red capsicum

Onion

Two potatoes

After half an hour, the salt will have drawn a lot of the moisture out of the eggplant, so you can rinse it off, dry it thoroughly, and chop it up too.


Heat up some vegetable oil in a frying pan (or, if you're actually following the recipe, a cast iron casserole dish. But my beloved Le Creuset is in a box in the depths of the garage. So an electric frying pan it was!). Once it's heated, add the onion along with two cloves of garlic, two teaspoons of curry paste, one teaspoon of mustard seeds, a cinnamon stick, a big chunk of ginger, and half a teaspoon of turmeric.

Stir it all up and cook for a few minutes, then add in three curry leaves (there's a third one there, I promise).

Cook for a couple more minutes, then dump in all the vegetables.

Stir them well to coat in the paste, then take a 400mL can of whole peeled tomatoes, blitz the crap out of them in a food processor, then add it into the pan and stir it all together.

Put the lid on, and simmer until the vegetables are soft. Add a can of coconut milk, put the lid back on, and simmer for another ten minutes:

Salt to taste, take out the curry leaves, the cinnamon stick, and the big lump of ginger (small problem: we couldn't find it. It's somewhere in the leftovers...) and serve with steamed rice:

Verdict: It was good. And it was really easy. But considering how many spices went into it, it wasn't all that flavourful. If I were to make it again, I'd probably use a medium or hot curry paste rather than the mild paste I used. Because really, 2 teaspoons isn't all that much in the grand scheme of things! I'd also probably use coconut cream instead of coconut milk for a stronger flavour. And I'd also fry the vegetables for 5 minutes or so before adding in the tomatoes. I think it would let them absorb more of the spices.

According to the recipe, you can use whatever vegetables you have on hand, as long as it includes potato. So it's pretty adaptable!! And, depending on the contents of your curry paste, it's vegan (unless you dump a spoonful of plain yoghurt on the top, like my dad did...)!

Do you have a go-to curry recipe (one that doesn't involve a jar of sauce from the supermarket!)??

K xx

Thursday, December 15, 2011

Challenge recipe 18: Strawberry jam

So if you guys follow me on Twitter or Facebook, you'd know that I spent all of Sunday making strawberry jam and lemon butter and mango chutney as Christmas presents. Needless to say, it was QUITE the long day. But successful, in the end, so I guess that's what really matters!

Aaaaaaaanyway. The recipe I used was part of my cookbook challenge. And making jam was also on my Day Zero list. So I've crossed things off TWO challenge lists in one hit! #score

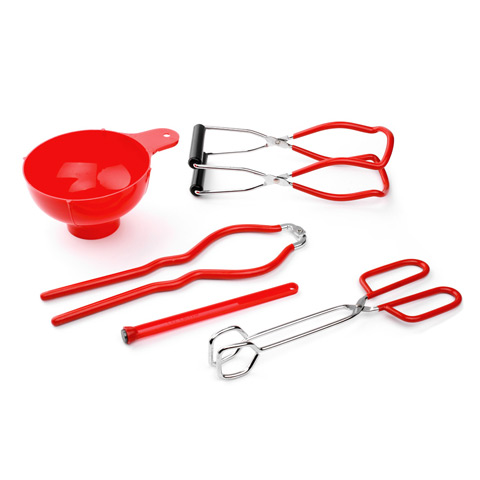
So. The most time consuming part of the entire process is actually sterilising the jars. A couple of days before, I bought a 5 piece home canning kit. It included a wide mouthed funnel, a magnetic stick thing to rescue the lids from the boiling water, a thingy that you can use to hold the hot jars while you do the lids up, a pair of tongs, and a thingy that you can use to lift the jars out of the boiling water (top right).
See? Source
All technical terms, obviously. Buying this kit was by far the best thing I could have done before attempting to make my own preserves. If you're planning on making anything that requires you to sterilise jars, I highly recommend you track one down. It was dirt cheap, too!

</segue> Here's the book:

And here's what you'll need:

Pretty simple, huh? Oh, and before you start, get a bunch of small plates or sauce dishes or whatever and put them in the fridge/freezer. You'll need them for testing if it's set later on.

To be perfectly honest, I was a little scared going in. Not just because ARGH BOILING FRUIT AND HOT JARS AND WHAT IF IT DOESN'T SET PROPERLY?!?!?! but because this was my Year 9 Home Economics book. It was first published in 1966. This edition was published in 1993, but I suspect a lot of the recipes hadn't been updated since the 60s. There is a shit ton of WASP-y food in there, yo. (Any book that teaches you to make devilled sardines should be treated with caution...) From memory, we mostly used it for the cake recipes, the cake decorating instructions, and possibly pinwheel sandwiches. Because no girl's education is complete without the ability to make pinwheel sandwiches! #seriouslyWTF

Ahem. You'll need 500g of strawberries. I weighed out 500g before I chopped them. But they had quite a lot of manky bits on them, so I reweighed them to ensure I had enough.

Put the chopped up strawberries in a large saucepan. Add in two cups of white sugar.

Yes, I know two cups is a buttload of sugar. Just do it. Squeeze a lemon:

It helps if you have an excited six year old to do it for you. Pick out the seeds and add the juice to the saucepan. Then add in 1 tablespoon of pectin. In case you're curious, here's what pectin looks like:

So, now's about the time that you want to get your jars going. Cookery the Australian Way says otherwise, but the instructions that came with the jars said to wash them in hot soapy water, rinse them off, then put them in boiling water for ten minutes. So that's what I did!

Turn the heat on under the fruit mixture, and stir constantly while bringing to the boil:

I'm sorry. I know it looks gross. Once it's boiling, reduce the heat SLIGHTLY and cook for six minutes, still stirring regularly. To simplify the clean up later, you can use a pastry brush dipped in water to dissolve any sugar that's stuck to the sides of the saucepan.

After the six minutes, grab one of the plates/dishes/whatever that you put in the fridge/freezer earlier. Take a teaspoon, and grab a little bit of the hot jam. Pour it into the cold dish and leave it for about 20 seconds:
I just realised this is technically a tea cup not a sauce dish. WHATEVER.

Once you can tip the dish and the mixture doesn't move, run your finger through it. If the surface of the jam gets crinkle marks on it, it's going to set. If not, keep cooking it and try again after another couple of minutes. Mine took either ten or twelve minutes. Once it passes the gel test, take the saucepan off the heat. Grab a clean spoon, and scrape as much of the foam off the top as you can. It's not essential (or at least I don't *think* it is!), it just looks prettier without it.

If you've timed things well, your jars should be done with their ten minutes of boiling. Turn the heat off. Haul them out of the boiling water with your handy dandy jar grabber doohickey, tip the water out of them, and set them upside down on a clean tea towel to drain. Once they're all out of the water, use the handy dandy jar grabber doohickey to turn them right way up again. Using your handy dandy canning funnel, ladle the jam mixture into the jars. I did them one at a time. Don't fill them all the way to the top - there needs to be a gap to create a vacuum so the jar will seal and the jam won't go mouldy and give you food poisoning.

Obviously, you can use the little plastic square things and rubber bands. It's probably much easier. But my jars came with lids and caps, so that's what I used. I found that the easiest way to do it was to fill a jar, then dump the lid into now-not-quite-boiling water, slowly count to ten, haul it out with the magnetic doohickey, and put it straight onto the jar. Then put the cap thingy over the top and tighten. But not too much. The instructions said 'finger tight', whatever the bleeding hell that might mean. Basically, if you do it too tight, it can't form a vacuum. So don't do it too tight, 'kay? Repeat until you've used all the jam.

It made three cups. Once you've finished, leave it somewhere to cool for at least 24 hours. At the end of the time, check if the jars have sealed. If not, open immediately and eat it all yourself.

These were intended as Christmas presents. But there was one jar that didn't seem to have sealed *quite* as much as I would have liked, so I was a little hesitant to give it to my relatives. So I get to eat it instead.

The verdict? NOM!! It's freaking amazing, you guys. Plus, it's not as sickly sweet as some store-bought strawberry jams are. I mean, YES, you can walk down the road to the supermarket and buy a jar of jam and not have to go through all the drama. But where's the fun in that?! ;)

Has anyone else made jam before? How did it go? (And did anyone else have a weird WASP-y home ec book???)
K xx

PS. The mango chutney and the lemon butter are pretty amazeballs too. If anyone wants the recipes, just let me know!!

Friday, November 18, 2011

Challenge recipe 15: Chicken fajitas

I realised the other day that the last time I made anything for my Cookbook Challenge was waaaaaaaaaaay back in JUNE when I made Portuguese custard tarts and raspberry souffles in the one weekend. I figured it was about time I rectified my slacking and make use of my cookbooks again!

I bought this book a couple of years ago, but I think the only recipes I've ever made are some kind of salsa and guacamole. I actually cheated a little on the recipe - you're meant to make the tortillas from scratch. But I was trying to make dessert at the same time. Plus, I didn't want to buy an entire container of lard (yes, seriously. And EEEEEUW.) for the small quantity the tortilla recipe called for. So I cheated and bought pre-made ones. They were fine, not surprisingly!

Anyway, here's the book:

And here's what you'll need:

Start by zesting the limes. If you're lucky and live in somewhere that's NOT Australia, you probably won't be sobbing over the amount of money you had to spend buying 2 limes as you zest (Seriously - they're $2.50 EACH):

Once you've finished zesting, stick the limes in the microwave for 15 seconds or so, and then squeeze them. When it comes to limes, I never bother with a juicer. I just squeeze them straight into the bowl:


Then add two tablespoons of caster sugar...

...a teaspoon of dried oregano...

...a teaspoon of cinnamon...

...and half a teaspoon of cayenne pepper.

Mix it all together. Trim and slice up the three chicken breasts, and dump them in to marinate for at least half an hour:

While the meat is marinating, thinly slice the three capsicums and the onion:

When the meat has had its half an hour of marinating, heat a couple of spoonfuls of oil in a frying pan and dump the meat in, marinade and all:

Let it cook for about five minutes, then add in the vegetables:

Cook for another couple of minutes. While it's cooking, prepare some toppings:

I had intended to use mashed avocado, but all the avocados at the supermarket were rock hard, so we had to make do with store bought guacamole... Oh, and the cheese is not included in the list of toppings suggested by the book. But this is me we're talking about, so cheese is pretty much obligatory! Feel free to leave it out.

Dump the chicken mixture into the bowl and forget to wipe down the sides before you take a photo make it look all purdy:

Serve thusly!


The verdict? They're pretty freaking awesome. It's quite a bit different to your stereotypical fajitas. It tastes clean and fresh thanks to the lime juice, rather than having that smoky taste that fajitas tend to have. The cinnamon adds unexpected flavour over the lime. And veggies were quite moist and juicy rather than having that slightly caramelised outside crunch. I guess that's the difference when there's a marinade involved rather than a dry spice mixture! The next time I make it, I might try not including the dregs of the marinade and see what happens. I might also try cooking the veggies first, taking them out of the pan, cooking the chicken and *then* combining it at the last minute to see if it'll retain some of the crunch.

Basically? It's really quick and easy. The marinade took about five minutes to make, and you'd have to chop the veggies and the meat even if you were using the packet spice mix. Sure, you have to allow half an hour for the meat to marinate. But it's totally worth it. Oh, and don't replace the limes with lemons. Sure, they may be four times the price for something half the size. But you can really taste that gorgeous, tropical, lime flavour in the end product.

Give them a go and let me know what you think!!

K xx
Related Posts Plugin for WordPress, Blogger...