Now that my parents are overseas and I don't have to make sure everything is gluten free so that my mum doesn't feel left out, I thought it was about time to cross something else off the cookbook challenge list! This is quite possibly the easiest recipe I've made so far - it literally took about 5 minutes to make and 20 minutes to cook.
Here's the book:
And here's what you'll need:
Pretty simple, huh? Technically, the recipe calls for cherry jam. But the best my crappy supermarket could deliver was plum, raspberry and cherry. Same same but different, I guess?!
Start by cutting a piece of puff pastry into four. The recipe just said puff pastry, but I used butter puff pastry because a) puff pastry only came in packs of ten, and I didn't want ten sheets of puff pastry, and b) it made more sense in my head, seeing as it was a dessert recipe.
Place a tablespoon of cream cheese in the middle of each piece of pastry.
Add a tablespoon of jam to the top of the cream cheese. Obviously, this worked brilliantly and the jam didn't at all fall off the cream cheese and ooze across the pastry...
Pull the four corners of the pastry together, and twist. The one on the left at the front (which is conveniently out of focus) is probably the best example to try and copy.
Bake at 200 degrees C for about 20 minutes.
Dust with icing sugar, and serve hot (or, according to the recipe, cold with coffee. But I don't drink coffee, so I didn't test that out).
Be aware that when jam has been in a 200 degree oven for 20 minutes, it has the approximate temperature as molten lava... I learnt the hard way. Don't be me.
The verdict? They're pretty freaking good. Especially for something that takes a whopping five minutes to prepare. But it did end up that one half was cream cheese and the other half was jam, so I think the next time I make them, I'll mix 4 tablespoons of jam with 4 tablespoons of cream cheese, and then put two tablespoons of mixture onto each piece of pastry. I might also try it with different types of jam to see which I like best. The plum, raspberry and cherry combo was nice, but tooth-achingly sweet.
So there you have it. Insanely easy, kind of impressive if you have a friend coming over for coffee ("Would you like a danish? I made them myself!"), and pretty damned tasty.
K xx
Showing posts with label jam. Show all posts
Tuesday, September 18, 2012
Thursday, December 15, 2011
Challenge recipe 18: Strawberry jam
So if you guys follow me on Twitter or Facebook, you'd know that I spent all of Sunday making strawberry jam and lemon butter and mango chutney as Christmas presents. Needless to say, it was QUITE the long day. But successful, in the end, so I guess that's what really matters!
Aaaaaaaanyway. The recipe I used was part of my cookbook challenge. And making jam was also on my Day Zero list. So I've crossed things off TWO challenge lists in one hit! #score
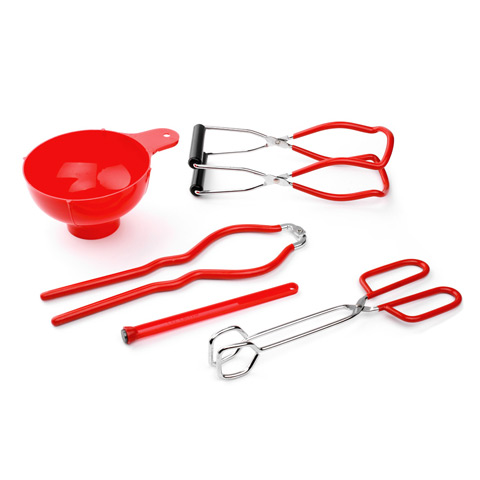
So. The most time consuming part of the entire process is actually sterilising the jars. A couple of days before, I bought a 5 piece home canning kit. It included a wide mouthed funnel, a magnetic stick thing to rescue the lids from the boiling water, a thingy that you can use to hold the hot jars while you do the lids up, a pair of tongs, and a thingy that you can use to lift the jars out of the boiling water (top right).
All technical terms, obviously. Buying this kit was by far the best thing I could have done before attempting to make my own preserves. If you're planning on making anything that requires you to sterilise jars, I highly recommend you track one down. It was dirt cheap, too!
</segue> Here's the book:
And here's what you'll need:
Pretty simple, huh? Oh, and before you start, get a bunch of small plates or sauce dishes or whatever and put them in the fridge/freezer. You'll need them for testing if it's set later on.
To be perfectly honest, I was a little scared going in. Not just because ARGH BOILING FRUIT AND HOT JARS AND WHAT IF IT DOESN'T SET PROPERLY?!?!?! but because this was my Year 9 Home Economics book. It was first published in 1966. This edition was published in 1993, but I suspect a lot of the recipes hadn't been updated since the 60s. There is a shit ton of WASP-y food in there, yo. (Any book that teaches you to make devilled sardines should be treated with caution...) From memory, we mostly used it for the cake recipes, the cake decorating instructions, and possibly pinwheel sandwiches. Because no girl's education is complete without the ability to make pinwheel sandwiches! #seriouslyWTF
Ahem. You'll need 500g of strawberries. I weighed out 500g before I chopped them. But they had quite a lot of manky bits on them, so I reweighed them to ensure I had enough.
Put the chopped up strawberries in a large saucepan. Add in two cups of white sugar.
Yes, I know two cups is a buttload of sugar. Just do it. Squeeze a lemon:
It helps if you have an excited six year old to do it for you. Pick out the seeds and add the juice to the saucepan. Then add in 1 tablespoon of pectin. In case you're curious, here's what pectin looks like:
So, now's about the time that you want to get your jars going. Cookery the Australian Way says otherwise, but the instructions that came with the jars said to wash them in hot soapy water, rinse them off, then put them in boiling water for ten minutes. So that's what I did!
Turn the heat on under the fruit mixture, and stir constantly while bringing to the boil:
I'm sorry. I know it looks gross. Once it's boiling, reduce the heat SLIGHTLY and cook for six minutes, still stirring regularly. To simplify the clean up later, you can use a pastry brush dipped in water to dissolve any sugar that's stuck to the sides of the saucepan.
After the six minutes, grab one of the plates/dishes/whatever that you put in the fridge/freezer earlier. Take a teaspoon, and grab a little bit of the hot jam. Pour it into the cold dish and leave it for about 20 seconds:
Once you can tip the dish and the mixture doesn't move, run your finger through it. If the surface of the jam gets crinkle marks on it, it's going to set. If not, keep cooking it and try again after another couple of minutes. Mine took either ten or twelve minutes. Once it passes the gel test, take the saucepan off the heat. Grab a clean spoon, and scrape as much of the foam off the top as you can. It's not essential (or at least I don't *think* it is!), it just looks prettier without it.
If you've timed things well, your jars should be done with their ten minutes of boiling. Turn the heat off. Haul them out of the boiling water with your handy dandy jar grabber doohickey, tip the water out of them, and set them upside down on a clean tea towel to drain. Once they're all out of the water, use the handy dandy jar grabber doohickey to turn them right way up again. Using your handy dandy canning funnel, ladle the jam mixture into the jars. I did them one at a time. Don't fill them all the way to the top - there needs to be a gap to create a vacuum so the jar will seal and the jam won't go mouldy and give you food poisoning.
Obviously, you can use the little plastic square things and rubber bands. It's probably much easier. But my jars came with lids and caps, so that's what I used. I found that the easiest way to do it was to fill a jar, then dump the lid into now-not-quite-boiling water, slowly count to ten, haul it out with the magnetic doohickey, and put it straight onto the jar. Then put the cap thingy over the top and tighten. But not too much. The instructions said 'finger tight', whatever the bleeding hell that might mean. Basically, if you do it too tight, it can't form a vacuum. So don't do it too tight, 'kay? Repeat until you've used all the jam.
It made three cups. Once you've finished, leave it somewhere to cool for at least 24 hours. At the end of the time, check if the jars have sealed. If not, open immediately and eat it all yourself.
These were intended as Christmas presents. But there was one jar that didn't seem to have sealed *quite* as much as I would have liked, so I was a little hesitant to give it to my relatives. So I get to eat it instead.
The verdict? NOM!! It's freaking amazing, you guys. Plus, it's not as sickly sweet as some store-bought strawberry jams are. I mean, YES, you can walk down the road to the supermarket and buy a jar of jam and not have to go through all the drama. But where's the fun in that?! ;)
Has anyone else made jam before? How did it go? (And did anyone else have a weird WASP-y home ec book???)
K xx
PS. The mango chutney and the lemon butter are pretty amazeballs too. If anyone wants the recipes, just let me know!!
Aaaaaaaanyway. The recipe I used was part of my cookbook challenge. And making jam was also on my Day Zero list. So I've crossed things off TWO challenge lists in one hit! #score
So. The most time consuming part of the entire process is actually sterilising the jars. A couple of days before, I bought a 5 piece home canning kit. It included a wide mouthed funnel, a magnetic stick thing to rescue the lids from the boiling water, a thingy that you can use to hold the hot jars while you do the lids up, a pair of tongs, and a thingy that you can use to lift the jars out of the boiling water (top right).
![]() |
| See? Source |
</segue> Here's the book:
And here's what you'll need:
Pretty simple, huh? Oh, and before you start, get a bunch of small plates or sauce dishes or whatever and put them in the fridge/freezer. You'll need them for testing if it's set later on.
To be perfectly honest, I was a little scared going in. Not just because ARGH BOILING FRUIT AND HOT JARS AND WHAT IF IT DOESN'T SET PROPERLY?!?!?! but because this was my Year 9 Home Economics book. It was first published in 1966. This edition was published in 1993, but I suspect a lot of the recipes hadn't been updated since the 60s. There is a shit ton of WASP-y food in there, yo. (Any book that teaches you to make devilled sardines should be treated with caution...) From memory, we mostly used it for the cake recipes, the cake decorating instructions, and possibly pinwheel sandwiches. Because no girl's education is complete without the ability to make pinwheel sandwiches! #seriouslyWTF
Ahem. You'll need 500g of strawberries. I weighed out 500g before I chopped them. But they had quite a lot of manky bits on them, so I reweighed them to ensure I had enough.
Put the chopped up strawberries in a large saucepan. Add in two cups of white sugar.
Yes, I know two cups is a buttload of sugar. Just do it. Squeeze a lemon:
It helps if you have an excited six year old to do it for you. Pick out the seeds and add the juice to the saucepan. Then add in 1 tablespoon of pectin. In case you're curious, here's what pectin looks like:
So, now's about the time that you want to get your jars going. Cookery the Australian Way says otherwise, but the instructions that came with the jars said to wash them in hot soapy water, rinse them off, then put them in boiling water for ten minutes. So that's what I did!
Turn the heat on under the fruit mixture, and stir constantly while bringing to the boil:
I'm sorry. I know it looks gross. Once it's boiling, reduce the heat SLIGHTLY and cook for six minutes, still stirring regularly. To simplify the clean up later, you can use a pastry brush dipped in water to dissolve any sugar that's stuck to the sides of the saucepan.
After the six minutes, grab one of the plates/dishes/whatever that you put in the fridge/freezer earlier. Take a teaspoon, and grab a little bit of the hot jam. Pour it into the cold dish and leave it for about 20 seconds:
| I just realised this is technically a tea cup not a sauce dish. WHATEVER. |
Once you can tip the dish and the mixture doesn't move, run your finger through it. If the surface of the jam gets crinkle marks on it, it's going to set. If not, keep cooking it and try again after another couple of minutes. Mine took either ten or twelve minutes. Once it passes the gel test, take the saucepan off the heat. Grab a clean spoon, and scrape as much of the foam off the top as you can. It's not essential (or at least I don't *think* it is!), it just looks prettier without it.
If you've timed things well, your jars should be done with their ten minutes of boiling. Turn the heat off. Haul them out of the boiling water with your handy dandy jar grabber doohickey, tip the water out of them, and set them upside down on a clean tea towel to drain. Once they're all out of the water, use the handy dandy jar grabber doohickey to turn them right way up again. Using your handy dandy canning funnel, ladle the jam mixture into the jars. I did them one at a time. Don't fill them all the way to the top - there needs to be a gap to create a vacuum so the jar will seal and the jam won't go mouldy and give you food poisoning.
Obviously, you can use the little plastic square things and rubber bands. It's probably much easier. But my jars came with lids and caps, so that's what I used. I found that the easiest way to do it was to fill a jar, then dump the lid into now-not-quite-boiling water, slowly count to ten, haul it out with the magnetic doohickey, and put it straight onto the jar. Then put the cap thingy over the top and tighten. But not too much. The instructions said 'finger tight', whatever the bleeding hell that might mean. Basically, if you do it too tight, it can't form a vacuum. So don't do it too tight, 'kay? Repeat until you've used all the jam.
It made three cups. Once you've finished, leave it somewhere to cool for at least 24 hours. At the end of the time, check if the jars have sealed. If not, open immediately and eat it all yourself.
These were intended as Christmas presents. But there was one jar that didn't seem to have sealed *quite* as much as I would have liked, so I was a little hesitant to give it to my relatives. So I get to eat it instead.
The verdict? NOM!! It's freaking amazing, you guys. Plus, it's not as sickly sweet as some store-bought strawberry jams are. I mean, YES, you can walk down the road to the supermarket and buy a jar of jam and not have to go through all the drama. But where's the fun in that?! ;)
Has anyone else made jam before? How did it go? (And did anyone else have a weird WASP-y home ec book???)
K xx
PS. The mango chutney and the lemon butter are pretty amazeballs too. If anyone wants the recipes, just let me know!!
Subscribe to:
Posts (Atom)